Building Robust Flutter Apps: Clean Architecture + TDD
Building high-quality, scalable apps in Flutter can be challenging as your project grows.

Introduction
In this article, we’ll explore how Clean Architecture and Test-Driven Development (TDD) work together to help you build Flutter apps that are not only easy to maintain but also scale gracefully over time.
We’ll break down the core principles behind each approach, how to implement them in your Flutter project, and why they matter for your app’s long-term health.
Why Should You Care About Clean Architecture and TDD?
As apps grow, they become harder to maintain, test, and scale. Without a proper structure, adding features can lead to bugs, code that’s hard to understand, and slow development.
That's where Clean Architecture and TDD come in.
- Clean Architecture Divides your app into well-defined layers that separate business logic, UI, and data access, making your code easier to understand and modify.
- TDD (Test-Driven Development): Helps you write code that’s reliable from the start by writing tests before you implement functionality, ensuring that you catch bugs early.
These two practices help you build Flutter apps that are maintainable, easy to scale, and less prone to bugs.
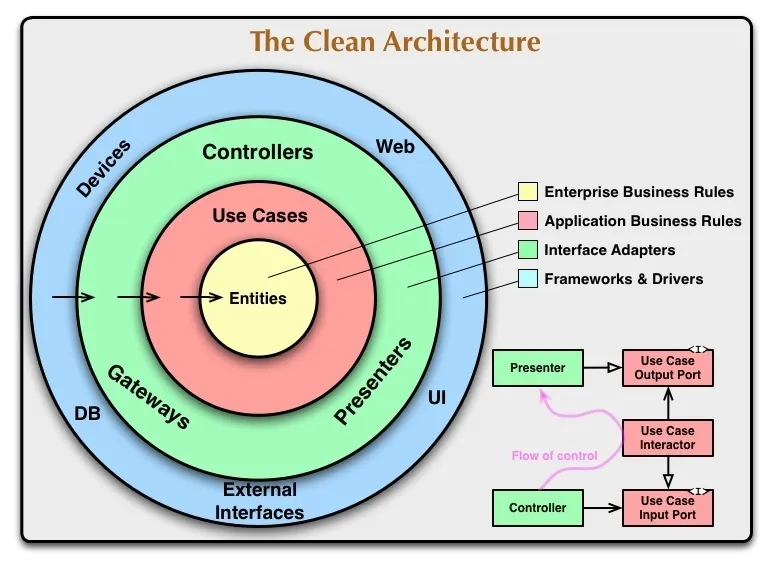
What Is Clean Architecture?
At its core, Clean Architecture is all about separating concerns within your app. The goal is to decouple the business logic from other parts of the app, making the system flexible and easy to test.
Core Principles:
- Dependency Inversion: Inner layers (business logic) don’t depend on outer layers (UI, data access). This makes your app more flexible and easier to change.
- Separation of Concerns: Each part of the app focuses on one thing, like handling the UI, business logic, or data.
- Testability: Each layer is independent, which makes it easier to test individual parts of your app
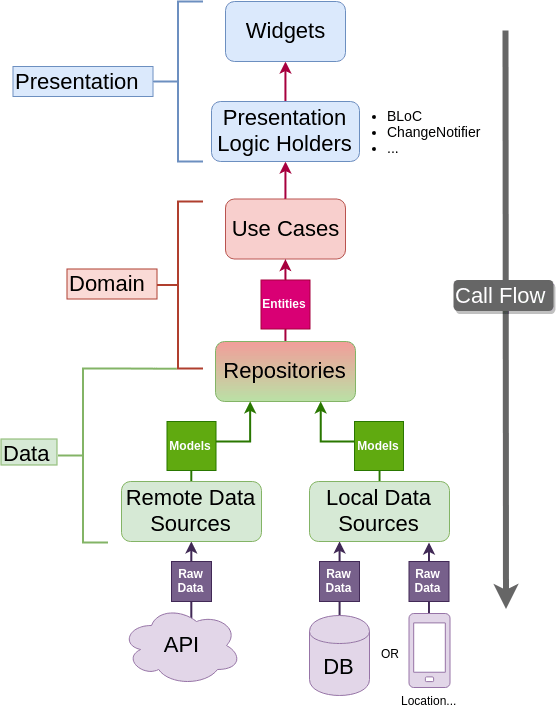
The Layers of Clean Architecture in Flutter
Clean Architecture splits your app into distinct layers. Here’s a breakdown of the layers you'll work with in Flutter:
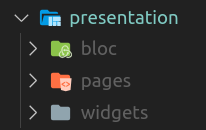
1. Presentation Layer (UI)
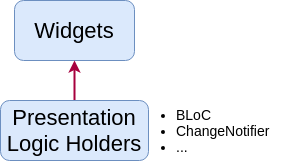
The Presentation Layer is responsible for everything the user sees and interacts with. It includes the UI components, such as Widgets, Controllers, and State Management solutions, which manage the state of the application and handle user input.
Key Responsibilities:
- Display data to the user.
- Handle user inputs like button clicks, form submissions, and gestures.
- Update the UI based on state changes.
In Flutter, this usually means working with Widgets, and managing state either with setState, Provider, Riverpod, or any other state management solution you prefer.
Example:
// Presentation Layer - Flutter UI Code
class ProductListPage extends StatelessWidget {
  final ProductListViewModel viewModel;
  ProductListPage({required this.viewModel});
  @override
  Widget build(BuildContext context) {
    return Scaffold(
      appBar: AppBar(title: Text("Product List")),
      body: FutureBuilder>(
        future: viewModel.getProducts(),
        builder: (context, snapshot) {
          if (snapshot.connectionState
              == ConnectionState.waiting) {
            return Center(
                    child:
                      CircularProgressIndicator()
                  );
          } else if (snapshot.hasError) {
            return Center(
                    child:
                      Text("Error: ${snapshot.error}")
                    );
          } else {
            final products = snapshot.data ?? [];
            return ListView.builder(
              itemCount: products.length,
              itemBuilder: (context, index) {
              return ListTile(
                title: Text(products[index].name),
              );},
            );
          }
        },
      ),
    );
  }
}
In this example, ProductListPage is a simple UI that fetches a list of products from the viewModel (which will interact with the Domain Layer).
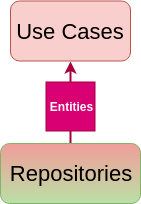
2. Domain Layer (Business Logic)
The Domain Layer contains the core business logic of the app. This is where you define Use Cases (also called Interactors)—the actions the app performs, independent of any UI or data source. This layer is essential for keeping the app's logic separate from the rest of the app, making it easy to maintain, test, and scale.

Key Responsibilities:
- Encapsulate the business logic of the app.
- Define use cases that specify what the app should do, like "fetch a product list" or "add a new product."
- Be independent of any UI or data layer, which allows for easier testing.
Example:
Let’s say you want to fetch a list of products. Here’s how you’d define that business logic in the Domain Layer:
  // Domain Layer - Use Case (Interactor)
  class GetProductList {
    final ProductRepository repository;
    GetProductList(this.repository);
    Future> execute() async {
      return await repository.getProducts();
    }
  }
In this example, GetProductList is a use case that interacts with the ProductRepository in the Data Layer. It doesn’t know anything about how the products are fetched—it just knows that calling repository.getProducts() will return the necessary data.
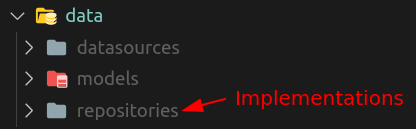
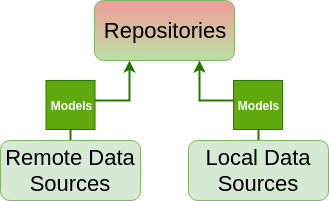
3. Data Layer (Repositories and Data Sources)
The Data Layer is where all data manipulation happens—this layer is responsible for fetching, saving, and processing data from external sources like APIs, local storage, or databases.
Key Responsibilities:
- Fetch data from external sources (e.g., APIs, databases).
- Provide an abstraction layer for data access, so the Domain Layer doesn’t have to worry about implementation details.
- Ensure the app is always working with up-to-date or cached data.
Repositories are typically defined here to serve as a unified interface for accessing data, while Data Sources handle the interaction with external systems like network APIs or local storage.
Example:Here’s how you might define a ProductRepository and its data source:
// Data Layer - Repository
class ProductRepository {
  final ProductApiDataSource apiDataSource;
  ProductRepository(this.apiDataSource);
  Future> getProducts() async {
    return await apiDataSource.fetchProducts();
  }
}
// Data Layer - Data Source (API Interaction)
class ProductApiDataSource {
  final HttpClient client;
  ProductApiDataSource(this.client);
  Future> fetchProducts() async {
    String url = "https://api.example.com/products"
    final response = await
      client.get(Uri.parse(url));
    if (response.statusCode == 200) {
      final List data = json.decode(response.body);
      return data.map((e)
              => Product.fromJson(e)).toList();
    } else {
      throw Exception('Failed to load products');
    }
  }
}
In this example:
- ProductRepository provides a method (getProducts) that fetches product data using a ProductApiDataSource.
- ProductApiDataSource is responsible for actually making the API call and parsing the response.
This separation allows you to easily swap out the API implementation for a mock or another data source (like a local database) without affecting the rest of the app.
Tip: Keeping business logic and UI code separate allows you to swap out the UI or data layer without impacting your app’s core functionality.
Why Clean Architecture Is a Game-Changer for Your Flutter Apps
Here’s why adopting Clean Architecture will save you time and headache in the long run:
-
1. Improved Testability: By isolating your app’s components, you can easily test the business logic without worrying about UI or external APIs.
- Example: You can test a use case to fetch user data without needing to call a real API.
-
2. Better Maintainability: Since changes to one layer won’t impact others, maintaining and updating the app becomes much simpler.
- Example: You can refactor the data layer without affecting the presentation or domain layers.
- 3. Scalability: As your app grows, Clean Architecture ensures it remains modular, so you can add new features without rewriting everything.
- 4. Framework Independence: The business logic is independent of the UI framework (like Flutter), which means you can swap out the framework in the future if needed.
What Is Test-Driven Development (TDD)?
TDD is a development approach where tests are written before the actual code. This results in cleaner, more reliable code that’s easier to maintain. The cycle goes like this:
- Red Write a test that fails because the feature doesn’t exist yet.
- Green Write just enough code to make the test pass.
- Refactor Clean up the code while ensuring all tests pass.
How Does TDD Work in Practice?
TDD encourages you to think about your app's behavior before you start coding. This leads to better-designed code and fewer bugs.
Steps of the TDD Cycle:
- Write a Failing Test: Start by writing a test for the feature you’re about to build. Since the feature isn’t there yet, the test will fail.
- Write Just Enough Code: Write the simplest code that will make the test pass.
- Refactor: After the test passes, improve the code without breaking the test. This could mean making the code more efficient or readable.
Setting Up Your Flutter Project with Clean Architecture and TDD
When you set up a Flutter project with Clean Architecture and TDD, there are a few steps to follow:
-
1. Install Testing Dependencies:
- You'll need flutter_test for writing tests and mockito or mocktail for mocking dependencies like API calls.
-
2. Organize Your Project:
- Divide your project into layers: presentation, domain, and data.
Example:/lib ■ /presentation ■ /domain ■ /data
- 3. Create Initial Tests:
- Start by writing tests for individual components, like use cases and repositories, before implementing any functionality.
Building a Feature Step-by-Step: Example of Fetching Data from an API
Let’s break down how you’d implement a feature with Clean Architecture and TDD.
- Step 1: Write the Failing Test: Start by writing a test for the feature you’re about to build. For example, you can write a test for fetching a list of products.
- Step 2: Create the Use Case: Implement the use case that fetches the list of products, ensuring it passes the test you wrote.
- Step 3: Mock the Data: Use mockito to mock the API response, so you can test your use case without relying on a real API.
- Step 4: Refactor the Code: Once your test passes, refactor the code to make it cleaner and more efficient.
Wrapping It Up: Why Clean Architecture and TDD Are Essential for Robust Flutter Apps
Combining Clean Architecture with Test-Driven Development helps you build Flutter apps that are maintainable, scalable, and easy to test. It enables your app to grow without becoming a tangled mess, and it ensures that your code is always reliable and bug-free.
Next Steps:- Start by setting up a new Flutter project using Clean Architecture.
- Implement the first feature with TDD and see how easy it is to maintain and scale.
- Dive deeper into TDD with resources like this guide or explore Clean Architecture principles in-depth with Robert C. Martin’s book.
Want to learn more? Consider exploring resources like "Clean Architecture" by Robert C. Martin and diving into Flutter testing documentation.
Flutter Clean Architecture TDD